Panduan Belajar Photoshop, Tutorial Photoshop, Contoh Hasil Photoshop, Cara Membuat Efek di Photoshop

Diberdayakan oleh Blogger.
Sabtu, 06 September 2008

Meluruskan gambar (perspective)


pada tuturial ini akan dijelaskan mengenai teknik untuk meluruskan gambar yang rotasinya kurang sempurna
dengan menggunakan rahasia photoshopRuler Tool (j), ok kita praktekan sekarang :

[1] buka gambar yang akan diluruskan, mis:
rahasia photoshop
[2] Pilih Ruler Tool, kemudian tarik lurus dari atas kebawah sesuai dengan kelurusan gambar tersebut
anda bisa menentukannya dari gambar yang bisa dianggap lurus, seperti contoh berikut :
mengambil kelurusan dari objek Tiang.
rahasia photoshop
[3] pilih menu Image>Rotate Canvas>Arbitrary..., setelah muncul jendela Rotate Canvas Tekan OK, maka
gambar secara otomatis akan lurus sesuai garis yang tadi kita tarik.
rahasia photoshop
[4] Setelah gambar terlihat lurus anda bisa mengCropNya(memotong) atau Menyeleksinya kemudian dipindahkan
ke objek lain..
Selasa, 02 September 2008

Pasang IKLAN di SINI

Kami memberi kesempatan bagi Anda untuk memasang iklan di blog ini dengan harga yang murah, yaitu:

1. Rp. 10.000/Bulan untuk Iklan banner ukuran 90x90 pixel (Dipasang di sidebar).


bagi yang berminat silahkan email ke : dens86@gmail.com untuk proses lebih lanjut

kami menerima Format Iklan Mentah (belum di buat image), biaya desain GRATISSSS


Daftar Sekarang, Anda mendapat Bonus 1x Submit + PING Ke Ratusan WEB IKlan di GROW URL
Minggu, 31 Agustus 2008

Solusi Cetak Photo Mudah dg FOTO SLATE


Jika anda ingin buka percetakan photo berikut saya bagi-bagi tips cara agar cetak photo anda lebih mudah, cepat dan terorganisir.

Software tambahan yang saya gunakan adalah FotoSlate 4 (dari ACD) download disini


Dan berikut Tutorial LengkapNya:
1. Instal dulu FotoSlateNya (next, next sampai finish)
2. Setelah terinstal Kita akan mulai coba Mencetak Photo, Siapkan photo yang akan dicetak
3. Buka Foto Slate 4 (bisa dari Start menu atau dari Desktop) , maka akan muncul tampilan seperti berikut

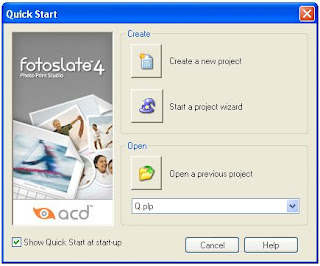
jika tidak muncul silahkan Close dan Buka kembali

4. untuk mulai mencetak pilih Start a Project Wizard, maka muncul tampilan berikut:


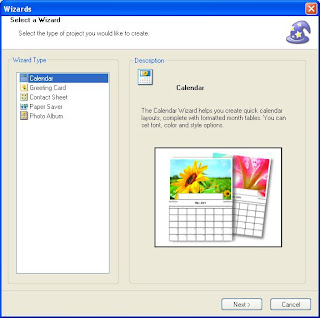
5. Pilih Contact Sheet, kemudian Next, maka muncul tampilan


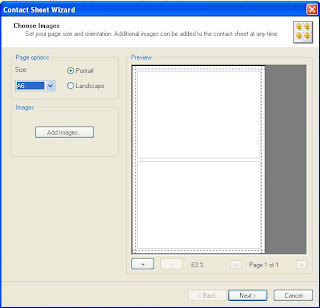
Pada Page Option, Size = pilih ukuran kertas, Potrait = Horizontal, Landscape = Vertikal, lebih jelas mengenai ukuran saya lampirkan dibawah.
6. Kemudian Next, maka muncul tampilan seperti dibawah :


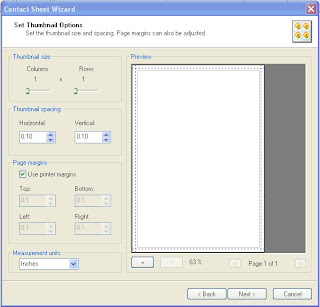
Thumbnail size, Column = Jumlah photo yang akan dicetak kesamping, Rows = Jumlah photo yang akan dicetak kebawah
Thumbnail spacing, Horizontal = Margin kesamping, Vertikal = Margin kebawah
7. Kemudian Next, maka muncul tampilan


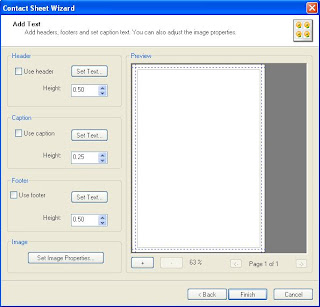
Tampilan diatas berfungsi untuk menambahkan texs pada photo seperti Judul, jadi jika tidak ingin menambahkan text abaikan saja.
8. Kemudian Finish, maka muncul tampilan

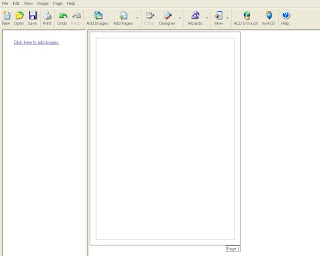
Tampilan diatas merupakan area kerja kita, untuk menambahkan Pilih Add Images pada toolbar diatas, atau melalui link click here to add images, atau dapat juga mendrag n drop dari Windows Explorer.
9. Setelah Photo terpilih akan ditampilkan di jendela kiri. Kita tinggal Drag n Drop (Tekan, Pindahkan) ke Area Kertas.
10. untuk Mencetak photo tekan Print, atau Ctrl+P


Ukuran Photo
2 x 3 = Pada Page Option, Size = A6, Potrait
Thumbnail Size > Column : 4, Rows : 4
Thumbnail Spacing > Horizontal : 0.05, Vertikal : 0.15
Measurement units = inches

3 x 4 = Pada Page Option, Size = A6, Potrait
Thumbnail Size > Column : 3, Rows : 3
Thumbnail Spacing > Horizontal : 0.10, Vertikal : 0.20
Measurement units = inches

4 x 6 = Pada Page Option, Size = A6, Potrait
Thumbnail Size > Column : 2, Rows : 2
Thumbnail Spacing > Horizontal : 0.40, Vertikal : 0.70
Measurement units = inches

3R = Pada Page Option, Size = A6, Potrait
Thumbnail Size > Column : 1, Rows : 1
Thumbnail Spacing > Horizontal : 0.10, Vertikal : 0.10
Measurement units = inches

Demikian tips dari saya semoga bisa bermanfaat bagi anda, Untuk ukuran lainnya silahkan anda modifikasi sendiri
Sabtu, 23 Agustus 2008

Template

Nama Template : ROck Star
design by : Dens-ray @ dens-ray.blogspot.com

dowload via 4shared


Nama Template : Strawberry
design by : Dens-ray @ dens-ray.blogspot.com


dowload via 4shared


Seleksi Mudah dengan photoshop CS3


pada tutorial berikut akan saya gambarkan mengenai kemudahan seleksi pada adobe photoshop CS3 dengan menggunakan Salah satu Fitur terbarunya yaitu Quick Selection Tool dan Refine Edge...

ok langsung aja PenjelasanNya-----------
Quick Selection Tool, tool ini adalah pengembangan dari Magic Wand Tool tapi tool ini lebih mudah dalam menyeleksi, tool ini berada tepat bersama Magic Wand Tool untuk memilihnya tinggal klik pada Tools atau tekan dari keyboard (bila tool yang tersorot Magic Wand Tool
maka anda Klik Kanan pada tool tersebut dan pilih Quick Selection Tool)


<<---->> berikut Praktek Nya <<---->>
[1] Buka Photo yang akan di edit
contoh


[2] pilih Quick Selection Tool, Atur Diameter Brush jgn terlalu besar , pada gambar tersebut ditunjukan pula Simbol (+)dan(-), jika dipilih simbol (+) maka akan membuat seleksi penambahan, dan jika (-) akan sebaliknya.


[3] tahap seleksi>>>>
Tekan dan tahan (Klik) pada posisi Awal dimana saja,tahan jangan dilepas kemudian Drag/Geser Perlahan sampai akhir. jika ada yang belum terseleksi maka bisa ditambahkan/dilanjutkan, atau jika melebihi objek bisa juga diKurangi dengan memilih tanda (+) (-) pada properti bar diatas.

[4] tahap Finishing>>>>
sekarang kita perhalus seleksinya menggunakan Refine Edges yang ada pada properti bar diatas anda bisa mengatur Radius(memperbesar/kecil seleksi), Contrast(pencahayaan pada ujung seleksi), Smooth(Kehalusan Seleksi), Feather(untuk menambahkan efek feather), Contract/Expand sprti gambar berikut

dan anda bisa melihat Preview Seleksi dengan berbagai background pada menu ini apakah anda ingin melihat pada background hitam, putih, normal, quickmask atau inverse setelah anda sesuai dengan selera kemudian Pilih OK.

[5] dan gambar siap dipindahkan ke objek lain


Kamis, 24 Juli 2008

Gratis Starter Kit DVD dari Neatbean

Selingan nih.... Hr ini aku males nulis Tutorial aku ngasih Kabar Gembira Aja ah.
Kemarin Pagi Tgl. 23 Juli 2008.. ada tukang Pos datang,,, dia ngasih Amplop, kirain Surat dari Siapa pas Aku liat dari Czech Republik eh ternyata dari Neatbeans... iseng2 aku ngisi pesanan di neatbeans disini untuk memesan Starterkit DVD gratis dari neatbeans... eh ternyata dapet walaupun agak lama sekitar hampir 1 bulanan dech.. tapi wajarkan Soalnya Jauh... Gratis LAgi
jadi apabila anda2 hobby Programming terutama Java Kenapa ga Coba nih caranya langsung isi aja formulirnya disini isikan email, nanti konfirmasi lewat email. oke


jika DVD telah dikirimkan nanti akan ada email sprti berikut:
======================================================================

*Order No.237161, 2008-06-06*

*Shipping Address*
Deden Mulyana
-----------------------------------------
Cianjur
Jawa Barat
43211
Indonesia

DVD: language English, platform: multi OS (Windows, Linux, Solaris x86,
Solaris SPARC and Mac OS X)

*Order Status*
*DVD was sent on 2008-06-26*

*Note*
Delivery time depends on your location.
Common delivery time is up to 5 weeks.
If you reside in India, it may be up to 6 weeks.
*Please be patient*.


If you didn't recieve your DVD after 5 or 6 weeks, please reply to the
order confirmation email and mention your problem. Our team will send
you another DVD. Thanks!

======================================================================
nah sekian silakan coba ok... Gratis 100000%


Minggu, 06 Juli 2008

Twitter Cash Made Easy!


What is Twitter?
Twitter Cash Made Easy!, Twitter is a free social networking and micro-blogging service that enables its users to send and read each others' updates, known as tweets. Tweets are text-based posts of up to 140 characters, displayed on the author's profile page and delivered to other users - known as followers - who have subscribed to them. Senders can restrict delivery to those in their circle of friends or, by default, allow open access. Users can send and receive tweets via the Twitter website, Short Message Service (SMS) or external applications. The service is free over the Internet, but using SMS may incur phone service provider fees.


how to make money by twitter and Quick Success on Twitter! ?
1) Put an ad in any blank space at the end of your 140-character messages — i.e. “Drink an ice cold, refreshing Pepsi.”

2) Send out an advertisement every 10th or 50th (whatever you learn to be OK with your users) twitter. Thus, I may receive 10 twitters of news announcements, and the 11th is an advertisement for Grey Goose vodka.

Next options…

3) Pay-Per-Twitter Message — If there was a username called “NYCtechJobs” — any person looking for a tech job in NYC could be a friend of this list, and be notified instantly of any new NYC tech jobs. Where would those jobs come from? Initially possibly just from Craigs List, Monster, Hot Jobs, etc … but then say you have 2,000 users that are the friends of “NYCtechJobs”, that means you have 2,000 prospective tech employees in the NYC area. A company would love to get their latest tech job out to those prospects, so they can find a hire — thus, they go to a web page you have setup, and they are able to create a message up to 140 characters (likely include a URL to full job details) with some details on the job. You can charge the employer for posting this.

Ditto with a list (er, username) like “NYCfurniture”. People could pay to broadcast their message to all of the friends of “NYCfurniture”.

4) Charge for access to your Twitter messages — Your username can be private and only your friends can receive/view your twitters. Thus, if you had valuable/timely information — you could have a subscription-based service where you charge $X for people to be your friend, and then they would have access to your twitters. Thus, a celebrity could charge for this — or a newspaper might do this to give you access to the news first — or some blogger that finds online shopping deals could send them to you … basically, if the user wanted to be “in the know” for whatever offering, they’d pay $X for access (per week or month). Note: You’d have to verify their subscriptions — and if they haven’t paid for the month, you’d remove them as a friend from your Twitter account.

5) Commissions on user purchases — Setup a service that allows users to buy products through this. User would need to setup an account with you with their credit card (or PayPal info, or a deposit into this proposed payment service) stored. I imagine a user could be browsing Wired magazine and be able to quickly purchase a subscription for $10 by ripping out their cell phone, Twittering a code like “d buy wired”, with a confirmation coming back to the user and them approving the confirmation possibly using a password, then the transaction occurring. Make $1k+/day on Twitter

The biggest question on everyone’s minds is what Evan Williams is thinking. They’re opening up their back-end to allow the development of applications on the Twitter platform (which I think is real smart, because people are going to build useful applications for Twitter users — and everyone will be using Twitter in some capacity more often) … but will Evan plan to charge these companies that are building apps? Will Evan not want these apps monetizing themselves? How is Evan planning to monetize Twitter — or will he sell and leave that to a Yahoo/Microsoft/News Corp to figure out how to extract value out of the massive userbase (like his sale of Blogger to Google)? I don’t think Evan knows the answers quite yet — he’s just focused on building a great application for users.